> For the complete documentation index, see [llms.txt](https://df-manual.gitbook.io/df-book/llms.txt). Markdown versions of documentation pages are available by appending `.md` to page URLs; this page is available as [Markdown](https://df-manual.gitbook.io/df-book/all-circles/df-shared-drive/how-to-structure-files-folders-and-documents.md).

# How To Structure Files, Folders & Documents

### 🗂️ How to Structure Files, Folders, and Documents in the Team's Shared Drive

#### 🎯 Goal: <a href="#lrwfnee329yu" id="lrwfnee329yu"></a>

To create a clear, accessible, and organized folder structure that helps everyone find documents quickly and reduces duplication or confusion.

#### ✅ Step-by-Step Instructions

***Step 1: Open Your Team’s Shared Drive***

1. Go to[ ](https://drive.google.com)[drive.google.com](https://drive.google.com).<br>
2. On the left panel, click ‘Shared Drives’, select your circle’s drive (e.g., IT Circle).

<figure><img src="https://3790142297-files.gitbook.io/~/files/v0/b/gitbook-x-prod.appspot.com/o/spaces%2FJbWd8kIN0U4a2HVR5aA6%2Fuploads%2FOTU1bd0Jq2AabuQSvAqW%2Fimage.png?alt=media&amp;token=4f536b5e-d725-4f6c-90cb-7511f7512444" alt=""><figcaption></figcaption></figure>

***Step 2: Create Top-Level Folders***

These represent major categories, functions, or ongoing initiatives.

Example Folder Structure:

●        Projects

●        Operations

●        Meetings<br>

How to do it:

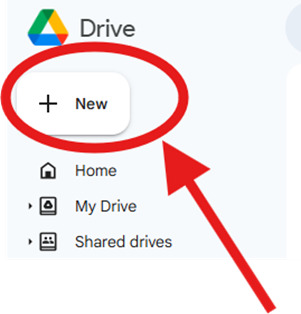
1. Inside your Shared Drive, click the ‘+ New’ button (top-left).

<figure><img src="https://3790142297-files.gitbook.io/~/files/v0/b/gitbook-x-prod.appspot.com/o/spaces%2FJbWd8kIN0U4a2HVR5aA6%2Fuploads%2FE28rRW6w2Kf7oaJGm5fC%2Fimage.png?alt=media&amp;token=d2f3dd5e-8406-449f-bd27-758641e0dd41" alt=""><figcaption></figcaption></figure>

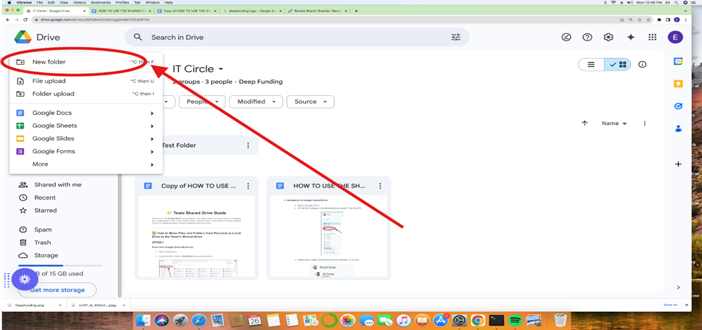
2. Select ‘New Folder’.

<figure><img src="https://3790142297-files.gitbook.io/~/files/v0/b/gitbook-x-prod.appspot.com/o/spaces%2FJbWd8kIN0U4a2HVR5aA6%2Fuploads%2FBdkP4KVgs6mUwLELhhoY%2Fimage.png?alt=media&amp;token=efa02196-078a-4d6e-b7cb-8b27c953f09c" alt=""><figcaption></figcaption></figure>

3. Name it (e.g., Projects) and click Create.

<figure><img src="https://3790142297-files.gitbook.io/~/files/v0/b/gitbook-x-prod.appspot.com/o/spaces%2FJbWd8kIN0U4a2HVR5aA6%2Fuploads%2FT1EPxNFdMn4vrFQkUt06%2Fimage.png?alt=media&amp;token=e6128967-78de-4279-b61d-6390c9f07839" alt=""><figcaption></figcaption></figure>

4. Repeat for other top-level categories.

***Step 3: Add Subfolders for Specific Context***

Break down folders by year, project name, or department.

Example:

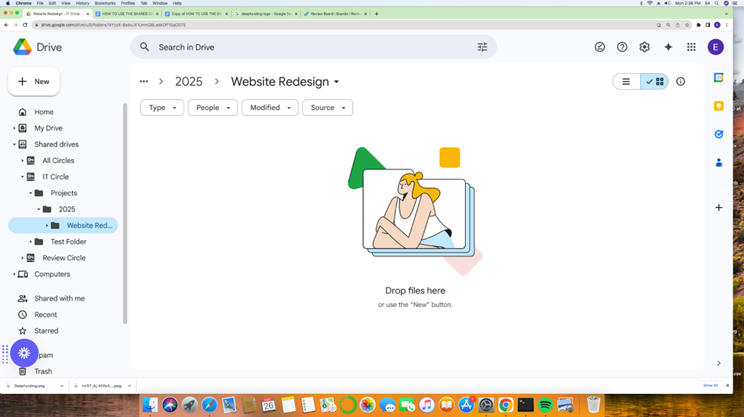
●        Projects > 2025 > Website Redesign

●        Meetings > 2025 > Weekly Standups

●        Operations > Finance > Q1 Reports\ <br>

How to do it:

1. Open a top-level folder (e.g., Projects).<br>
2. Click ‘+ New’ and ‘New Folder’.

<figure><img src="https://3790142297-files.gitbook.io/~/files/v0/b/gitbook-x-prod.appspot.com/o/spaces%2FJbWd8kIN0U4a2HVR5aA6%2Fuploads%2FPQBqbFYWNiQN2VcTCYTC%2Fimage.png?alt=media&amp;token=ed42a4c3-b3db-4b4d-9db8-3daffb3dfb70" alt=""><figcaption></figcaption></figure>

<figure><img src="https://3790142297-files.gitbook.io/~/files/v0/b/gitbook-x-prod.appspot.com/o/spaces%2FJbWd8kIN0U4a2HVR5aA6%2Fuploads%2F4hp9SJKN1Vt9HvT9jxwy%2Fimage.png?alt=media&amp;token=b0f6aed7-d902-4149-a8bf-1189e2ed1be0" alt=""><figcaption></figcaption></figure>

3. Create a folder for the year (e.g., 2025).

<figure><img src="https://3790142297-files.gitbook.io/~/files/v0/b/gitbook-x-prod.appspot.com/o/spaces%2FJbWd8kIN0U4a2HVR5aA6%2Fuploads%2FnCSoHOiA0FRS2n4goeKZ%2Fimage.png?alt=media&amp;token=1d905701-b85e-4098-9f12-9b02a01b20c6" alt=""><figcaption></figcaption></figure>

4. Open the ‘2025’ folder and add a new folder for a specific project (e.g., Website Redesign).

<figure><img src="https://3790142297-files.gitbook.io/~/files/v0/b/gitbook-x-prod.appspot.com/o/spaces%2FJbWd8kIN0U4a2HVR5aA6%2Fuploads%2FVagrtlYp6KF205kFlIe0%2Fimage.png?alt=media&amp;token=d2fb0dd2-b4a3-4980-a644-447f3205d264" alt=""><figcaption></figcaption></figure>

<figure><img src="https://3790142297-files.gitbook.io/~/files/v0/b/gitbook-x-prod.appspot.com/o/spaces%2FJbWd8kIN0U4a2HVR5aA6%2Fuploads%2Fa3tAZZAElRbWmSIovaiS%2Fimage.png?alt=media&amp;token=0e3f1724-8585-41bc-a6b4-272835176109" alt=""><figcaption></figcaption></figure>

<figure><img src="https://3790142297-files.gitbook.io/~/files/v0/b/gitbook-x-prod.appspot.com/o/spaces%2FJbWd8kIN0U4a2HVR5aA6%2Fuploads%2FgIFNVEu2plvYN1bDrfQL%2Fimage.png?alt=media&amp;token=9596e6cf-13cf-489e-b064-8bd46e403450" alt=""><figcaption></figcaption></figure>

***Step 4: Create and Store Files in the Right Folder***

Always create files within the right folder (not in My Drive).

Example:

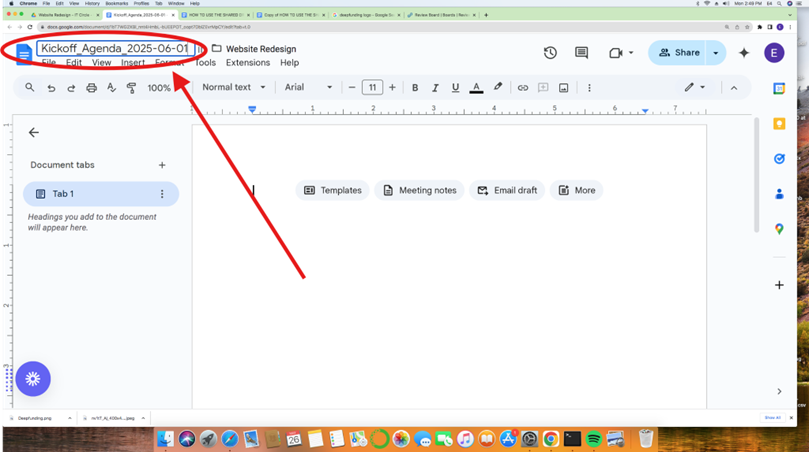
●     Projects > 2025 > Website Redesign > Kickoff\_Agenda\_2025-06-01.docx\ <br>

How to do it:

1. Navigate to the specific subfolder.

<figure><img src="https://3790142297-files.gitbook.io/~/files/v0/b/gitbook-x-prod.appspot.com/o/spaces%2FJbWd8kIN0U4a2HVR5aA6%2Fuploads%2FXAK8kqgwF2v7A3s2Ozrr%2Fimage.png?alt=media&amp;token=fea372d9-2376-4b88-a114-460e7d6efbb3" alt=""><figcaption></figcaption></figure>

2. Click ‘+ New’, select the type of file you want (e.g., Google Doc, Sheet, etc.), name the file using a clear naming convention.

<figure><img src="https://3790142297-files.gitbook.io/~/files/v0/b/gitbook-x-prod.appspot.com/o/spaces%2FJbWd8kIN0U4a2HVR5aA6%2Fuploads%2Fp1XC3HYQ7KnGlVmu4XZQ%2Fimage.png?alt=media&amp;token=af142ae7-fe96-4a5a-8d55-680dbaeb0efc" alt=""><figcaption></figcaption></figure>

<figure><img src="https://3790142297-files.gitbook.io/~/files/v0/b/gitbook-x-prod.appspot.com/o/spaces%2FJbWd8kIN0U4a2HVR5aA6%2Fuploads%2FCvjFTo5Af5oy22TINZJ2%2Fimage.png?alt=media&amp;token=83eabad4-766b-4fc3-ab1e-f9f6c0268e34" alt=""><figcaption></figcaption></figure>

<figure><img src="https://3790142297-files.gitbook.io/~/files/v0/b/gitbook-x-prod.appspot.com/o/spaces%2FJbWd8kIN0U4a2HVR5aA6%2Fuploads%2F2rC4oeHddNQNcILAwMua%2Fimage.png?alt=media&amp;token=8f0d6d94-b3b7-4c5a-95bb-56df00e25edf" alt=""><figcaption></figcaption></figure>

***Step 5: Apply Naming Conventions***

Use consistent naming patterns to aid search and clarity.

Suggested Format:

●        YYYY-MM-DD\_Description\_Type\
\
&#x20;Example: 2025-06-01\_KickoffMeeting\_Notes

<figure><img src="https://3790142297-files.gitbook.io/~/files/v0/b/gitbook-x-prod.appspot.com/o/spaces%2FJbWd8kIN0U4a2HVR5aA6%2Fuploads%2FFTxiNxFaNU6fBTFgjdU8%2Fimage.png?alt=media&amp;token=2f1b6b51-0ac2-4540-b664-f5fd8e89adb2" alt=""><figcaption></figcaption></figure>

Why?

a. Makes it easier to sort files.

b. Improves searchability and collaboration.

***Step 6: Add a README File to Key Folders***

Help teammates understand what each folder contains.

How to do it:

1. Go to a top-level or project folder (e.g., Projects), Click + New > Google Docs.

<figure><img src="https://3790142297-files.gitbook.io/~/files/v0/b/gitbook-x-prod.appspot.com/o/spaces%2FJbWd8kIN0U4a2HVR5aA6%2Fuploads%2FCsAVFpne5Kv77wTkpkzY%2Fimage.png?alt=media&amp;token=772b86b8-c68c-42b7-8624-dd826d026d29" alt=""><figcaption></figcaption></figure>

2. Name the file: README, and add:

○ Purpose of the folder

○ Key contents

○ Who manages it

○ Notes on access or naming conventions

<figure><img src="https://3790142297-files.gitbook.io/~/files/v0/b/gitbook-x-prod.appspot.com/o/spaces%2FJbWd8kIN0U4a2HVR5aA6%2Fuploads%2FoFTGBwwHB1w2gvMMFfm8%2Fimage.png?alt=media&amp;token=af905bc8-9cf5-48b0-aa12-c934c8a1c0cd" alt=""><figcaption></figcaption></figure>

***Step 7: Set Permissions Wisely***

Control access based on folder sensitivity and user roles.

Examples:

●     Allow View Only for reference folders (e.g., Templates).

●     Grant Editor access for collaborative folders (e.g., Projects).

●     Limit access to confidential folders (e.g., HR or Finance).<br>

How to do it:

1. Right-click a folder.
2. Click Share.

<figure><img src="https://3790142297-files.gitbook.io/~/files/v0/b/gitbook-x-prod.appspot.com/o/spaces%2FJbWd8kIN0U4a2HVR5aA6%2Fuploads%2Flk3j0O1KMOoqwMJUBxSm%2Fimage.png?alt=media&amp;token=a62e4a97-d922-49ef-8bcb-af00724bc665" alt=""><figcaption></figcaption></figure>

3. Add team members or groups.

• Choose access level: Viewer / Commenter / Editor / Manager.

<figure><img src="https://3790142297-files.gitbook.io/~/files/v0/b/gitbook-x-prod.appspot.com/o/spaces%2FJbWd8kIN0U4a2HVR5aA6%2Fuploads%2F3dTK1yJK9H8jYPdr1MRA%2Fimage.png?alt=media&amp;token=bef861ba-f5bd-4633-92d7-bf14ebe39c1c" alt=""><figcaption></figcaption></figure>

<br>